How to setup a new MVC Spring project on Eclipse STS with maven, automatic

In a previous post I explained how to set up spring with maven project, manually in eclipse. In this post we will do the same using the STS eclipse, which is much easier.

First of all, to have a common background and help the new ones in spring, let’s explain a few things. STS stands for Spring Tool Suite and is pretty much an Eclipse IDE with the Spring tools pre installed. You may download it from here . It comes in different versions, which differ in eclipse version and spring tools.
If you do not like to change your current eclipse installation and still want to have all the benefits of spring tools, download just the plugin and install it in your existing plugin. The tools plugin can be found and installed from eclipse market place, find information for the market site in here

I currently use the STS version 2.9.2 whith an indigo eclipse.
Screen Shot 2013-02-10 at 5.23.29 PM

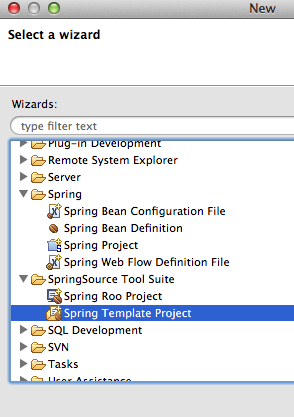
Open your STS or your eclipse with the sts plugin installed and choose
File -> New -> Other -> SpringSource Tool Suite -> Spring Template Project
Screen Shot 2013-02-10 at 5.26.50 PM

So, in our STS we will create an mvc project, with loggging and junit testing ready – in another post we’ll add a datasource to work with.

On template selection select the obvious, Spring MVC Project:
Screen Shot 2013-02-10 at 5.31.41 PM

On the next step of the wizard name your project, e.g. springSample, give a root level package :
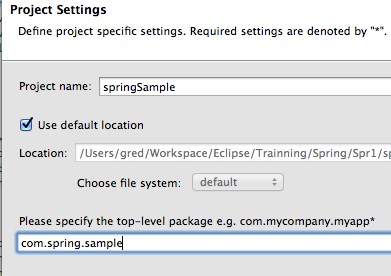
Screen Shot 2013-02-10 at 5.34.16 PM
And click finish.

Now let’s have a look what was created for us:
Screen Shot 2013-02-10 at 5.37.29 PM
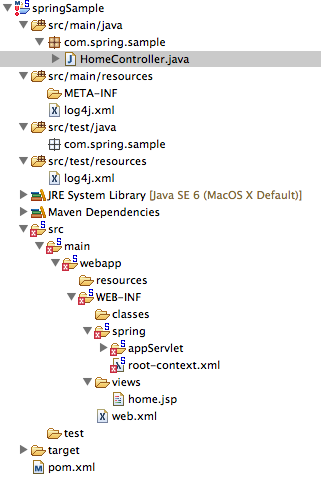
Pretty much everything we need:
– Directory to place our source code: src/main/java
– Directory to put our resources – xmls, properties files … – src/main/resources
– directory to place our test code: src/test/java
– Directory to place our test resources
– Web application root directory to place our web app pages and assets: src/main/webapp
Most importantly we have the spring environment set. The web xml has all apropriate configuration, such as the ContextListener, the servlet Dispatcher and forwarding all requests to the dispatcher set.
Additional configuration, is ready as follows:
– The annotation driven environment is ready, configured int he servlet-context.xml
– We can add any number of spring bean files in the src/main/resources directory
– we can add our pages in the src/main/webapp/WEB-INF/views, directory. There is already a sample page there the home.jsp.

You can also check the pom.xml file to see what libraries imports. Actually NOT all libraries found there are important to have a spring mvc project. I will not go into this. We will leave the pom as is. The only thing I will do is to change version of the spring, to show how easy it is to do.
We will do this in the properties of the maven file, the pom.xml. So we will alter from the 3.1.0:

<properties>
<java-version>1.6</java-version>
<org.springframework-version>3.1.0.RELEASE</org.springframework-version>
		<org.aspectj-version>1.6.9</org.aspectj-version>
<org.slf4j-version>1.5.10</org.slf4j-version>
</properties>

To the following:

<properties>
<java-version>1.6</java-version>
<org.springframework-version>3.1.2.RELEASE</org.springframework-version>
<org.aspectj-version>1.6.9</org.aspectj-version>
<org.slf4j-version>1.6.1</org.slf4j-version>
</properties>

I also altered the org.slf4j-version from 1.5.10 to 1.6.1 because of some compatibilities issues I run into. Do the same if you too wish to use the 3.1.2 version of spring. Otherwise leave ALL properties as they are.

Right click the project, choose maven -> Update Dependencies, let eclipse finish the job, then again right click and choose maven -> Update Project Configuration and let it finish.

Now, let’s see if everything works as expected. Go to com.spring.sample.HomeController page. There is already a web method the home. This listens to the root path ‘/’ of our application as the @RequestMapping indicates. Let’s check if it actually works.
Most probably the home method will be as follows:

@RequestMapping(value = "/", method = RequestMethod.GET)
	public String home(Locale locale, Model model) {
		logger.info("Welcome home! the client locale is "+ locale.toString());
		
		Date date = new Date();
		DateFormat dateFormat = DateFormat.getDateTimeInstance(DateFormat.LONG, DateFormat.LONG, locale);
		
		String formattedDate = dateFormat.format(date);
		
		model.addAttribute("serverTime", formattedDate );
		
		return "home";
	}

Which means that once it is called it returns as model attribute – request attribute – the time in your machine and afterwards it calls the home view, or the home page. This will be the home.jsp.

Let us change the method a bit, so we add our own signature in the testing – and for some new of us to understand how this spring works – as follows:

	/**
	 * Simply selects the home view to render by returning its name.
	 */
	@RequestMapping(value = "/", method = RequestMethod.GET)
	public String home(Locale locale, Model model) {
		logger.info("Welcome home! the client locale is "+ locale.toString());
		
		Date date = new Date();
		DateFormat dateFormat = DateFormat.getDateTimeInstance(DateFormat.LONG, DateFormat.LONG, locale);
		
		String formattedDate = dateFormat.format(date);
		
		formattedDate = "The date in my machine is: " + formattedDate + ".";
		
		model.addAttribute("myHomeMessage", formattedDate );
		
		return "home";
	}

So we will show in the page the message: The date on my machine is: February 8, 2013 …

Go to the home.jsp and alter as follows:

<%@ taglib uri="http://java.sun.com/jsp/jstl/core" prefix="c" %>
<%@ page session="false" %>
<html>
<head>
	<title>Home</title>
</head>
<body>
<h1>
	Hello world!  
</h1>

<P>  ${myHomeMessage}. </P>
</body>
</html>

Now we will run the project. Set up a tomcat – or a jboss, or any other jee – server and deploy the project – if you do NOT know you definetely need to read some documentation about the eclipse. Run the server and hit the following url in the browser:
http://localhost:8080/sample

If the previous is not working or you are not sure about the context-root of the app, right click your project in the package explorer and choose web project settings. The context-root of your app appear on the right:
Screen Shot 2013-02-10 at 7.20.48 PM

and you will see the following in the browser:

Hello world!

The date in my machine is: February 8, 2013 6:21:57 PM EET..

Which means that we are ok!! Our method called successfully and our message has been displayed correctly!
Additionally in tomcat’s output console we can see the follogin line:
INFO : com.spring.sample.HomeController – Welcome home! the client locale is en_US

Which also means that our log4j is setup correctly – the previous line was output due to the follwoing piece of code in our method: logger.info(“Welcome home! the client locale is “+ locale.toString());

To gain more confidence in our project we will create a fresh new controller and a new page which the controller will feed and call. We will create a page which will output a message, taken from the controller. The method will listens to the path: /sample/halloAction

First we will create a dedicated package for our controllers. We can add it anywhere we like – there is no limitation to which package a controller is placed – though with this we can have our code in order. In a few classes projects order may sound useless though in a few dozens it can be very helpful.
So, lets create a dedicated package for our controllers. We will create the package: com.spring.sample.controller. Now we create a class named com.spring.sample.controller.GreetController – another handy thing is to use as suffix the actuall name of the component. E.g. all controller java class names end in Controller, all services in Service and so on. THis help us understand from the name of the class what component is the class.
In order to make the spring understands that this class is a controller the only thing we need to add, is the annotation @Controller on the class as follows:

package com.spring.sample.controller;

import org.springframework.stereotype.Controller;

/**
 * @author gred
 *
 */
@Controller
public class GreetController {

}

We will create a method which will listens to the path sample/halloAction. The method name will be hallo taking as argument the model, in which we will place the message to send to the page.
Our method will be:

        @RequestMapping(value="/halloAction", method = RequestMethod.GET)
	public String hallo(Model model) {
		String theMessage = "Hallo Stranger!";
		model.addAttribute("halloMessage", theMessage);
		return "hallo";
	}

Let’s examine the method a little:
– RequestMapping: is the annotation that tells spring to which http request this method must be called. The value inside the RequestMapping annotation is the request, relative to context-root of the app. THis means that we do not need to add the whole request path: /sample/halloAction but the rest beyond the sample, cause the sample is the root of our web app and should be ommited. The RequestMethod.GET indicates that it is a GET Http request.
– We send to the hallo page the Hallo Stranger message.
Spring understands from the hallo that it should try to find a hallo.jsp page in the views directory from the configuration in the servlet-context.xml file. The following lines do that:

<!-- Resolves views selected for rendering by @Controllers to .jsp resources in the /WEB-INF/views directory -->
	<beans:bean class="org.springframework.web.servlet.view.InternalResourceViewResolver">
		<beans:property name="prefix" value="/WEB-INF/views/" />
		<beans:property name="suffix" value=".jsp" />
	</beans:bean>

So whether you wish to alter the directory of your pages feel free to do so by altering these lines – actually the second line.

Next we create our hallo.jsp file in the view and add the following lines:

<%@ taglib uri="http://java.sun.com/jsp/jstl/core" prefix="c" %>
<%@ page session="false" %>
<html>
<head>
	<title>Home</title>
</head>
<body>
<h1>
	Hello world!  
</h1>

<P>  ${halloMessage} </P>
</body>
</html>

And we are ready to test our page. Deploy the app again and use the following url in your browser:
http://localhost:8080/sample/halloAction
and we see the following:

Hello world!

Hallo Stranger!

I believe that you got it and you are ready to build your app. A couple of things are missing.
The first is testing and is the one that follows in the next paragraphs. The other is the datasource!! Normally we will need a datasource and a persistence framework to use in our application! I will post in the next days a related post, as an extension to this. For now let’s see how to set up the environment for junit testing.
Before doing anything else we need our appropriate dependencies. Add the following xml lines in your pom.xml file:

<dependency>
			<groupId>junit</groupId>
			<artifactId>junit</artifactId>
			<version>4.8.1</version>
			<scope>test</scope>
		</dependency>
		<dependency>
			<groupId>org.springframework</groupId>
			<artifactId>spring-test</artifactId>
			<version>${org.springframework.version}</version>
			<scope>test</scope>
		</dependency>

Actually the junit already existed. Just alter the version and add the spring-test dependency.
The test packages are there and ready to use them. Let’s create a test class named com.sample.spring.MainTests in the src/test/java source directory.
The MainTests class should look like the following:

package com.spring.sample;

import org.junit.runner.RunWith;
import org.springframework.test.context.ContextConfiguration;
import org.springframework.test.context.junit4.SpringJUnit4ClassRunner;

@RunWith(SpringJUnit4ClassRunner.class)
@ContextConfiguration(locations={"file:src/main/webapp/WEB-INF/spring/appServlet/servlet-context.xml"})
public class MainTests {

}

The 2 annotations are:
– The annotation @RunWith(SpringJunit4ClassRunner.class) is to add the spring unit testing capability in our testing and the
– The @ContextConfiguration… tells the spring where to find the context files. Currently we only use one, the springapp-serlvlet.xml. If we used more and we wanted them in the tests we would add it here, as comma seperated strings.

We will test our halloAction with Mock request. So alter the MainTests as follows:


package com.spring.sample;

import static org.junit.Assert.assertEquals;

import org.junit.Before;
import org.junit.Test;
import org.junit.runner.RunWith;
import org.springframework.beans.factory.annotation.Autowired;
import org.springframework.context.ApplicationContext;
import org.springframework.mock.web.MockHttpServletRequest;
import org.springframework.mock.web.MockHttpServletResponse;
import org.springframework.test.context.ContextConfiguration;
import org.springframework.test.context.junit4.SpringJUnit4ClassRunner;
import org.springframework.web.servlet.HandlerAdapter;
import org.springframework.web.servlet.ModelAndView;
import org.springframework.web.servlet.mvc.annotation.AnnotationMethodHandlerAdapter;

import com.spring.sample.controller.GreetController;

@RunWith(SpringJUnit4ClassRunner.class)
@ContextConfiguration(locations={"file:src/main/webapp/WEB-INF/spring/appServlet/servlet-context.xml"})
public class MainTests {

	@Autowired
    ApplicationContext applicationContext;
	
	private MockHttpServletRequest request;
    private MockHttpServletResponse response;
    private HandlerAdapter handlerAdapter; 
    
    @Autowired
    private GreetController greetController;
    
	@Before
    public void setUp() {
       request = new MockHttpServletRequest();
       response = new MockHttpServletResponse();

       handlerAdapter = new AnnotationMethodHandlerAdapter();
    }
	
	@Test
	public void testHallo() throws Exception {
		
		request.setRequestURI("/halloAction");
		request.setMethod("GET");
	    final ModelAndView mav = handlerAdapter.handle(request, response, 
	               greetController);
	    
	    assertEquals("Hallo Stranger!", mav.getModel().get("halloMessage"));
	    assertEquals("hallo", mav.getViewName());
	   
	}
	
}

The method setUp which is annotated as before will be called before the tests because of the annotation.
This is the approach to test the actual web request and not just the method in our controller. To test the methods in our controllers we would use just the junit tests as we know it, just by adding the context xml files. In order to test web requests and verify proper running this is the way. These are the steps:
– Create a mockRequest and response before the tests
– Use the handlerAdapter to call the request you wish, by passing the mock request, mock response and the corresponding controller. The handlerAdapter will return a ModelAndView with which you can test if proper model attributes exist, with proper values and if the appropriate view.
Our controller adds in model an attribute named halloMessage with the value Hallo Stranger! which will be tested with the following line:
assertEquals(“Hallo Stranger!”, mav.getModel().get(“halloMessage”));

While the view returned by our method is the hallo, which will be tested with the following:
ssertEquals(“hallo”, mav.getViewName());

You may add as many methods in the class to test other web methods, or add other classes and use the same trick. Of course you can test other classes or layers – e.g. service layer, or dao layer – without the mock requests and responses. Just by plain junit testing!

Datasource set up in spring will be explained in a seperate post!

ENJOY!
gred

Quick and NON dirty method call with el in jsp 2.1, workaround

Imagine you have a java bean – normally it is a java bean otherwise you wouldn’t use it in el – and you like to call a plain method in jsp 2.1 through el.

Imagine that you have a bean and you want to add a new method which will return something based on other attributes and you have come to the conclusion that the most appropriate way to accomplish this is to only alter the object. So we would create the method inside the bean e.g.

public boolean isActive() {
    //some logic with the other attributes 
    //which finally returns true or false
}

Now the problem is that using this in the jsp IN 2.1 version our page will break:

<c:if test="$(account.isActive)" >
........
</c:if>

The problem is that we can only use getters so we get an error that no property exist!
The quick and easy way to overcome this is to actually place the property in the bean but not use it a all, use it just to fool el:

public class Account {
       //fake property to overcome el's limited functionallity       
       private boolean active;     
      
       //rest of java beans getters setters...
      
      public  isActive() {
          //our code to determine if it is active! NO need to return
         //or even touch the active boolean proeprty
      }
}

And that’s it! El will find the property will find it’s getter method, which is the isActive method and our code will run!

You may protest saying that we can actually use the active boolean and place the logic elsewhere and feed the object with value coming from the logic.

But, let’s imagine that the object is coming directly from the database – from whatever framework -, it is difficult to add this in a query, cause you may break other code and you end up deciding whether to add this in the service layer or like described in this post. Well, if this object is being used by others, or in other cases, instead of going in all the service layer methods that use the account object and alter to include the Active part, with this approach both domain and service layer methods remain untouched and you only need to make appropriate changes in the view layer!

Enjoy!
gred

Creating an entity request with jquery

Assuming that you wish to create an entity http request. That is a request where the information is passed in the body of the request and not as a parameter. The entity that we want to pass let’s say that it is a string.

First, to parse such request you may use a snippet like the following in a servlet:

InputString is = request.getInputString();
byte[] bytes = FileCopyUtils.copyToByteArray(is);
String requestBytes = new String(bytes, "UTF-8");

where FileCopyUtils is a spring’s framework class and the copyToByteArray is a fast method to take the bytes from a stream (you may find more information here).

The request.getInputStream() gives exactly the body of the request – as a stream.

Such request, let’s say a POST one, can be easily created in java code using my favorite’s open source foundation corresponding tool, the apache http commponents.
The following is enough:

HttpPost postMethod = new HttpPost(uri);
String text = "My entity String!";
StringEntity entity = new StringEntity(text, "UTF-8" );
postMethod.setEntity(entity);
HttpResponse response = httpClient.execute(postMethod);

which is a pretty easy to understand, piece of code.

Now, assuming that you wish to create such request – POST – from a web page using jquery.
Someone, who knows jquery would do something like the following:

$.ajax({
              url: '/myEntityRequestServlet',
              processData: false,
              data: $( '#text').val(),
              type: 'POST',
              
       }).done( function() {
                     alert( 'OK!');
       }).fail( function() {
                     alert( "Error occured!");
       });

where: myEntityRequestServlet is the path where the servlet listens and the #text is let’s say a text field (<input type=”text” id=”text” />).
Running that code simply won’t work, cause you need to specify the content-type (contentType: ‘text/plain; charset=utf-8’). To tell you truth I’m not really sure why!
So the following will work fine:

$.ajax({
              url: '/myEntityRequestServlet',
              processData: false,
              data: $( '#text').val(),
              type: 'POST',
              contentType: 'text/plain; charset=utf-8'
       }).done( function() {
                     alert( 'OK!');
       }).fail( function() {
                     alert( "Error occured!");
       });

You may set async property to false to make this request a full post and not an ajax one.

You may find related to this post documentation in the following links:
jquery ajax
apache httpClient samples

ServervletRequest getInputStream method

Enjoy!
gred

Setting up a spring mvc project with maven in eclipse

Setting up a new spring project for eclipse with maven is a very straight forward and easy task. In case for those wondering why to use maven, well, I will just suggest reading this page http://maven.apache.org/benefits-of-using-maven.html where almost all pros mentioned are true.

In this article we will create a ready for development spring mvc project that will also include the junit testing environment. I’m not going to give many details just a basic idea of how we can accomplish this with the eclipse.

Basic understanding of eclipse usage and of maven is required to understand this article.
Now, first of all you will need an existing jee eclipse (I use Indigo, 3.7 ) with the maven plugin installed and the spring tools installed (not required but would be very nice to have). For those NOT knowing how to have the previous requirements ready do the following:

1. Download the jee eclipse indigo from here: http://eclipse.org/downloads/packages/eclipse-ide-java-ee-developers/indigosr1

Install and start.

2. Go to eclipse marketplace (Help->Eclipse Marketplace). Search for the ‘Maven Integration for Eclipse WTP’ , if can’t find it just type maven in find field and hit go. A list of plugins related to maven will appear. Find the Maven Integration for Eclipse WTP , and click install.
Let the plugin installed appropriately, restart when prompt and complete.

3. If desired, install from the Eclipse Marketplace the spring tools as well.
Open Eclipse Marketplace (Help->Eclipse Marketplace) and install . To find this plugin you may search for spring and it should be the first plugin in the search results. Install completely – restart when prompt – and you are ready to go.

Our environment is ready to create the project. Before even opening the eclipse – if it is open is ok, but we won’t be doing anything in eclipse yet – we will create our basic structure for our project. I myself like to have the following structure for my project:

[project] ->src -> main -> java — folder for the source code
[project] ->src -> main -> resources — folder for the resources, xmls, property files etc….
[project] -> src -> main ->webapp — the root folder for the web application, will conteain the web content, pages, css, javascript files etc… and the web-inf folder
[project]->src-> test -> java -– The folder for the test source – junit test classes and anything related to junit testing
[project]->src-> test -> resources – The folder which will contain all resources for our tests.

Now, there are two ways to proceed. To create a new maven project in eclipse and use the previous structure on the way, OR to create the structures in the file system along with the pom of the project and import the project in the eclipse. I will show you the second approach.
We create the previous structure in the file system – inside the eclipse workspace and in the root folder we will create a pom.xml. Pom must look like the following:

<?xml version="1.0" encoding="UTF-8"?>
<project xsi:schemaLocation="http://maven.apache.org/POM/4.0.0 http://maven.apache.org/xsd/maven-4.0.0.xsd" xmlns="http://maven.apache.org/POM/4.0.0" xmlns:xsi="http://www.w3.org/2001/XMLSchema-instance">
  <modelVersion>4.0.0</modelVersion>
 
  <groupId>springtest</groupId>
  <artifactId>springTest</artifactId>
  <version>1.0-SNAPSHOT</version>
  <packaging>war</packaging>
     
  <name>Our Spring test project</name>
  <properties>
        <org.springframework.version>3.0.5.RELEASE</org.springframework.version>
        <javax.servlet.jstl.version>1.2</javax.servlet.jstl.version>
    </properties>
    
  <dependencies>
       <dependency>
            <groupId>org.springframework</groupId>
            <artifactId>spring-context</artifactId>
            <version>${org.springframework.version}</version>
       </dependency>
       

        <dependency>
            <groupId>org.springframework</groupId>
            <artifactId>spring-webmvc</artifactId>
            <version>${org.springframework.version}</version>
        </dependency>
        <dependency>
            <groupId>org.springframework</groupId>
            <artifactId>spring-web</artifactId>
            <version>${org.springframework.version}</version>
        </dependency>
        <dependency>
            <groupId>org.springframework</groupId>
            <artifactId>spring-test</artifactId>
            <version>${org.springframework.version}</version>
            <scope>test</scope>
        </dependency>
        
        <dependency>
            <groupId>javax.servlet</groupId>
            <artifactId>jstl</artifactId>
            <version>${javax.servlet.jstl.version}</version>
        </dependency>
	   <dependency>
            <groupId>log4j</groupId>
            <artifactId>log4j</artifactId>
            <version>1.2.16</version>
        </dependency>
	   
	   <dependency>
	     <groupId>junit</groupId>
		<artifactId>junit</artifactId>
		<version>4.8.1</version>
		<scope>test</scope>
	   </dependency>
  </dependencies>
 
  <build>
 
    <plugins>
 
            <plugin>
                <groupId>org.apache.maven.plugins</groupId>
                <artifactId>maven-compiler-plugin</artifactId>
                <configuration>
                    <source>1.6</source>
                    <target>1.6</target>
                    <encoding>UTF8</encoding>
                </configuration>
                <inherited>true</inherited>
            </plugin>
            
    </plugins>
	
	
	<resources>
            <resource>
                <directory>src/main/resources</directory>
                <filtering>true</filtering>
            </resource>
        </resources>
        <testResources>
            <testResource>
                <directory>src/test/resources</directory>
                <filtering>true</filtering>
            </testResource>
            <testResource>
                <directory>src/main/resources</directory>
                <filtering>true</filtering>
            </testResource>
        </testResources>
  </build>
</project>

This is all that we ‘ll be needing for the project. Notice the properties which reflect the versions of spring framework and the jstl. This is handy if you want latter on to upgrade your project with the newer versions. I’m not going to explain in detail what all the content means. If you do not understand you should read documentation about maven!

Now we are ready to create the eclipse project. We open eclipse and choose:
Import -> Maven -> Existing Maven projects

Next in the import wizard we point to the springTest folder and proceed to finish the wizard.
We are almost ready. The only thing that is needed right now is to add to our project a web facet.
Before adding a web facet we create a server in the server view. Any server we’ll do. I myself use jboss and tomcat.

In project Facets we click on the Dynamic Web module (should be checked) choose version 2.5 and from below we click on the further configuration available link we choose springTest as context root and set Content directory to:
Content Directory: /src/main/webapp
This step is important. If we don’t set content directory to /src/main/webapp then the eclipse will create an additional folder in our project named WebContent.
Also, click on runtimes on the right side of the panel and click runtimes, and choose the server created in previous step.

When finished (after hitting apply) the eclipse will have created a WEB-INF folder inside webapp and a web.xml file, which is our jee web xml file.
Alter web.xml content to the following

<?xml version="1.0" encoding="UTF-8"?>
<web-app xmlns:xsi="http://www.w3.org/2001/XMLSchema-instance" xmlns="http://java.sun.com/xml/ns/javaee" xmlns:web="http://java.sun.com/xml/ns/javaee/web-app_2_5.xsd" xsi:schemaLocation="http://java.sun.com/xml/ns/javaee http://java.sun.com/xml/ns/javaee/web-app_2_5.xsd" id="WebApp_ID" version="2.5">
  <display-name>springTest</display-name>
 
  <servlet>
    <servlet-name>springapp</servlet-name>
    <servlet-class>org.springframework.web.servlet.DispatcherServlet</servlet-class>
    <load-on-startup>1</load-on-startup>
  </servlet>

  <servlet-mapping>
    <servlet-name>springapp</servlet-name>
    <url-pattern>*.html</url-pattern>
  </servlet-mapping>
</web-app>

Create an xml file named springapp-servlet.xml inside the WEB-INF folder put the following content:

<?xml version="1.0" encoding="UTF-8"?>

<beans xmlns="http://www.springframework.org/schema/beans"
       xmlns:xsi="http://www.w3.org/2001/XMLSchema-instance"
       xmlns:context="http://www.springframework.org/schema/context"
       xsi:schemaLocation="http://www.springframework.org/schema/beans http://www.springframework.org/schema/beans/spring-beans-2.5.xsd
       http://www.springframework.org/schema/context http://www.springframework.org/schema/context/spring-context-3.0.xsd">

  <!-- the application context definition for the springapp DispatcherServlet -->
		<!-- Scans within the base package of the application for @Components to 
		configure as beans -->
	<!-- @Controller, @Service, @Configuration, etc. -->
	<context:component-scan base-package="springtest" />
	
	<bean id="viewResolver"
		class="org.springframework.web.servlet.view.InternalResourceViewResolver">
		<property name="prefix" value="/WEB-INF/jsp/" />
		<property name="suffix" value=".jsp" />
	</bean>
</beans>

In the spring beans xml: We set base path springiest to look for controllers so everything inside springiest package annotated with @Controller will be added in controllers (we will create one in few will). All spring views should appear in a folder named asp inside WEB-INF (see below).

In order to test if spring works we’ll create a controller and a jsp file.
Create a class named springtest.controllers.HelloController inside the src/main/java source folder

package springtest.controllers;


import org.apache.log4j.Logger;
import org.springframework.web.bind.annotation.RequestMapping;
import org.springframework.stereotype.Controller;
import org.springframework.ui.Model;


@Controller
public class HelloController {
    protected final Logger logger = Logger.getLogger(getClass());

    @RequestMapping("/hello.html")
    public String handleRequest(Model model) {

        logger.debug("Returning index view");
        model.addAttribute("message", "HELLO!!!");
        return "hello";
    }
}

Create an index.jsp inside the webapp folder. The index.jsp should look like the following:

<%@ page language="java" contentType="text/html; charset=UTF-8"
    pageEncoding="UTF-8"%>
<% response.sendRedirect("hello.html"); %>

Finally create a jsp folder inside the WEB-INF folder and a page named hello.jsp with the following lines:

<%@ page language="java" contentType="text/html; charset=UTF-8"
    pageEncoding="UTF-8"%>
<%@ taglib uri="http://java.sun.com/jsp/jstl/core"
         prefix="c" %>
<!DOCTYPE html PUBLIC "-//W3C//DTD HTML 4.01 Transitional//EN" "http://www.w3.org/TR/html4/loose.dtd">
<html>
<head>
<meta http-equiv="Content-Type" content="text/html; charset=UTF-8">
<title>Hello page</title>
</head>
<body>
	<c:out value="${requestScope.message}"/>
</body>
</html>

Now you are ready to start and test the application.
If you start in tomcat and hit in browser: http://localhost:8080/springTest
You should see the following in the browser:
HELLO!!!
This means that spring is working properly.

Application first called index.jsp which redirected to hello.html which, through spring served by our controller and ended up in asp/hello.jsp.

Enjoy!
gred

Random selections and Draw

A very common task is a random selection of an object from a list of objects with equal possibilities. Don’t go far… the core api of java is more than enough to accomplish this task. The good old java.util.Random will do the job with remarkable results.

For example, let’s say from the 3 numbers 1, 2, 3, we want to select randomly one them each time with each having the same possibility. We’ll use the random.next(2) as follows:

List list = new ArrayList();
list.add(1);
list.add(2);
list.add(3);
Random r = new Random();
int selectedIndex = r.nextInt(3);
int selectedNumber = list.get(selectedIndex);
System.out.println("SELECTED: " + list.get(selectedNumber) + " \n\n");

Running the previous will output something like:
SELECTED: 1

Let’s make a thousand tests :

List<Integer> selections = new ArrayList<Integer>();
selections.add(0);
selections.add(0);
selections.add(0);
		
for(int i=0; i<1000; i++) {
         Random r = new Random();
         int selectedIndex = r.nextInt(3);
	 int selected = selections.get(selectedIndex) + 1;
	 selections.set(selectedIndex, selected);		
}
		
System.out.println("1 won: " + (selections.get(0)/(double)10) + "%");
System.out.println("2 won: " + (selections.get(1)/(double)10) + "%");
System.out.println("3 won: " + (selections.get(2)/(double)10) + "%");

We want it to be around 33% of each. Running it three times, gave me the following results:

First time:
   1 won: 32.9%
   2 won: 32.5%
   3 won: 34.6%
Second time:
   1 won: 32.6%
   2 won: 33.1%
   3 won: 34.3%
Third time:
   1 won: 32.7%
   2 won: 32.1%
  3 won: 35.2%

Pretty good results!!

Now let’s say that we want to make a draw in the 3 numbers, OR objects in a list with different possibilities. We’ll do the same trick, we’ll try to find the index of a list. We’ll have for the first number of the list (number in index 0) 25%, the second 30% and the last one 45% (total, of course 100%).

Here is the code with 1000 draws:

//the numbers, we won't use it in this case,
//but are displayed so that the possibilities below much for each number
List<Integer> numbers = new ArrayList<Integer>();
numbers.add(1);
numbers.add(2);
numbers.add(3);

//corresponding possibilities for the above numbers		
List<Integer> possibilities = new ArrayList<Integer>();
possibilities.add(25);
possibilities.add(30);
possibilities.add(45);	
List<Integer> sums = new ArrayList<Integer>();
sums.add(0);
sums.add(0);
sums.add(0);
		
for(int i=0; i<1000; i++) {
	Random r = new Random();
	int winner = r.nextInt(100) + 1;
	int sum = 0;
	for(int j=0; j<possibilities.size(); j++){
		sum+=possibilities.get(j);
		if(sum>=winner) {
			int s = sums.get(j);
			s += 1;
			sums.set(j, s);				
	                break;
		}
	}
}
			
System.out.println("1 won: " + (sums.get(0)/(double)10));
System.out.println("2 won: " + (sums.get(1)/(double)10));
System.out.println("3 won: " + (sums.get(2)/(double)10));

The previous will give you very good results. Mine were:

 1 won: 24.2
 2 won: 29.7
 3 won: 46.1

Your actual code of course will not have the iteration fro 0 to 1000, and the int s = sums.get(j); should be replaced with

int selectedNumber = sums.get(j);

And the selectedNumber will contain your selected number.

Enjoy!

Zip and download content from servlet

There are cases where is required to give the end users the ability to download some content zipped from a web application. In most cases you wouldn’t want to store any kind of content in the file system and keep the whole process in memory. This is very easy and no additional library is required to complete such task. You only need the ZipOutputStream

Let’s say that a servlet is responsible for serving such a content. In the doPost or doGet method you can have the following:

	/**
	 * @see HttpServlet#doPost(HttpServletRequest request, HttpServletResponse response)
	 */
	protected void doPost(HttpServletRequest request, HttpServletResponse response) throws ServletException, IOException {
		try {
			response.setContentType("application/zip");
	        response.setHeader("Pragma", "public");
	        response.setHeader("Content-Disposition", "attachment; filename=test.zip");

			ZipOutputStream zout = new ZipOutputStream(response.getOutputStream());

	        //add an entry to zip, a file named test.txt
			ZipEntry entry = new ZipEntry("test.txt");
			zout.putNextEntry(entry);

			Writer out = new OutputStreamWriter(zout);

	//add content to test.txt
	out.write("THIS IS MY CONTENT IN THE FILE!");

	           
		} catch(Exception ex) {
			ex.printStackTrace();
		} finally {
                  try{out.close();}catch(Exception e){}
                }
	}


The previous servlet will return a file named test.zip which will contain a file named test.txt and content: THIS IS MY CONTENT IN THE FILE!
The process will not use the file system in any way.

Be very careful when you want to use it with very large contents!

You may alter at will!

Serializing – Desirializing objects in .NET (C#)

Recently, since I was trying to find a very fast way to store my objects and have them ready to be used in a c# application – without the use of database – I of course, as a java developer, thought of the idea of seriliazing them into some other format. File format would be a very good choice. This is a very easy task in .NET (as many other).

Let’s suppose that we have a class named Resvation which looks like the following:

[Serializable]
public class Reservation {
private int adults = 0;
private int children;
private int numberOfRooms;
private int nights = 0;
private string reservationNumber;
public int Adults {
get{
return adults;
}
set{
adults= value;
}
}
public int Children {
get {
return children;
}
set {
children = value;
}
}
public Reservation() {
reservationNumber = PropertyUtils.getReservationId();
}
public DateTime? CheckIn { get; set; }
public DateTime? CheckOut { get; set; }
public int NumberOfRooms {
get {
return numberOfRooms;
}
set {
numberOfRooms = value;
}
}
public double TotalValue {
get;
set;
}
public string Room {
get;
set;
}
public int Nights {
get {
if(nights > 0)
return nights;
if(CheckIn != null && CheckOut != null)
return ((DateTime)CheckOut – (DateTime)CheckIn).Days;
return 0;
}
set {
if(value > 0)
nights = value;
}
}
public ClientInformation ClientInformation { get; set; }
public string HearAbout { get; set; }
public string AdditionalRequests { get; set; }
public string ReservationNumber {
get {
return reservationNumber;
}
set {
reservationNumber = value;
}
}
}

Note the ‘ [Serializable] ‘ which is the absolute important thing to make an object serializable.

In order for the previous object to be serializable the ClientInformation class should also be marked as serilizable.

Suppose that we need to store this kind of objects in the filesystem. This can be easilly done with the following piece of code:

FileStream fs = null;
try {
string path = “C:\\Bookings\\reservation”+reservation.ReservationNumber+”.data”;
if(File.Exists(path)) {
string newReservationNumber = getSafeReservationNumber(reservation.ReservationNumber);
reservation.ReservationNumber = newReservationNumber;
path = “C:\\Bookings\\reservation” + newReservationNumber + “.data”;
}
fs = new FileStream(path, FileMode.Create);
BinaryFormatter bf = new BinaryFormatter();
bf.Serialize(fs, reservation);
fs.Close();
} catch(Exception ex) {
throw ex;
} finally {
if(fs!=null)
try {
fs.Close();
} catch(Exception){}
}

FileStream fs = null;

try {

string path = “C:\\Bookings\\reservation”+reservation.ReservationNumber+”.data”;

if(File.Exists(path)) {

string newReservationNumber = getSafeReservationNumber(reservation.ReservationNumber);

reservation.ReservationNumber = newReservationNumber;

path = “C:\\Bookings\\reservation” + newReservationNumber + “.data”;

}

fs = new FileStream(path, FileMode.Create);

BinaryFormatter bf = new BinaryFormatter();

bf.Serialize(fs, reservation);

} catch(Exception ex) {

throw ex;

} finally {

if(fs!=null)

try {

fs.Close();

} catch(Exception){}

}

And that’s it. The previous piece of code will save our Reservation object in a file named reservation[ReservationNumber].data in the folder: c:\bookings.

The use of  reservation number will give us the ability to find the object later.

Now later when we’ll be needing the object back to our application we can easily desirialize with the following lines:

FileStream fs = null;

try {

fs = new FileStream(“C:\\Bookings\\reservation” + reservationNumber + “.data”, FileMode.Open);

BinaryFormatter bf = new BinaryFormatter();

Reservation reservation = (Reservation)bf.Deserialize(fs);

//use the reservation

} catch(Exception ex) {

throw ex;

} finally {

if(fs!=null)

try {

fs.Close();

} catch(Exception) { }

}

And that’s it!!!

Web Services with JBoss Seam

Using web services inside the seam framework is a pretty straight forward task. The documentation, which can be found here, does not contain so much information for the matter though not much need to be done to accomplish this task. Still, there are some things that need clarification in order for everything to work properly.

Let’s start from the beginning. To create a seam project is very easy and can be done with the same effort from the seam gen tool or from an IDE. I myself use the Jboos Developer studio which is an IDE that does not provide so much more than a plain eclipse with the jboss tools installed.

The seam version I am using is the 2.0.2 on a 4.2 – Jboss studio uses a 4.3 runtime environment but the same application works like a chalk in 4.2 application server. When I started creating – needed to do so for my work anyway – web services in jboss I was already using JDK 6 but this proved to be a very bad idea because I bumped into an error. This is better described here – https://64.74.196.157/jira/si/jira.issueviews:issue-html/JBWS-1439/JBWS-1439.html – and since I’m not generally in fond of the idea of moving jars around the server as I needed to do so to solve this issue – something that actually worked for all those searching for a solution – I downgraded to jdk 5.

For all those interested in the previous matter I found a jdk6 compatible 4.2 jboss server in jboss.org. I haven’t personally tested this server but I assume that it has this issue fixed.

The web service that we’ll make will be exposed from a stateless ejb.  According to jax-ws (or JSR 224) creating a web service is very easy and can be done with the use of annotations. Since we’ll use an ejb an interface is needed:

@Remote
public interface HalloServiceRemote {

public String sayHallo(String name);
}

And the stateless implementation:

package tera.services;

import javax.ejb.Stateless;
import javax.jws.WebMethod;
import javax.jws.WebParam;
import javax.jws.WebService;
import javax.jws.soap.SOAPBinding;

import org.jboss.seam.annotations.Name;
import org.jboss.seam.annotations.security.Restrict;
import org.jboss.seam.security.Identity;
import org.jboss.wsf.spi.annotation.WebContext;

/**
* @author gred
*
*/

@WebService(name=”SayHallo”, serviceName=”SayHalloService”)
@SOAPBinding(style=SOAPBinding.Style.RPC)
@WebContext(contextRoot=”service”)
@Stateless
public class HalloService implements HalloServiceRemote {

@WebMethod
public String sayHallo(@WebParam(name=”name”)
String name) {
return “Hallo “+ name + “!”;

}

}

The @WebContext is intentionally added because otherwise jboss serves the web service with a context identically with the ear name (including the ear suffix).

The final step before uploading your web service is to include the following xml (as described in documentation) in the META-INF directory of the ejb jar with the name standard-jaxws-endpoint-config.xml:

<jaxws-config xmlns=“urn:jboss:jaxws-config:2.0”
xmlns:xsi=
http://www.w3.org/2001/XMLSchema-instance&#8221;
xmlns:javaee=http://java.sun.com/xml/ns/javaee&#8221;
xsi:schemaLocation=“urn:jboss:jaxws-config:2.0 jaxws-config_2_0.xsd”>
<endpoint-config>
<config-name>Seam WebService Endpoint</config-name>
<pre-handler-chains>
<javaee:handler-chain>
<javaee:protocol-bindings>##SOAP11_HTTP</javaee:protocol-bindings>
<javaee:handler>
<javaee:handler-name>SOAP Request Handler</javaee:handler-name>
<javaee:handler-class>org.jboss.seam.webservice.SOAPRequestHandler</javaee:handler-class>
</javaee:handler>
</javaee:handler-chain>
</pre-handler-chains>
</endpoint-config>
</jaxws-config>

Even if you don’t include the previous xml the web service as it is so far will still function properly. If you intend to complete this demo you must include it for the later tasks.

That’s it, as far the web service! Deploy your ear and hit the following url in your browser: http://localhost:8080/jbossws/services . You will see the following screen:

jbossWebSrvScreen

If it will be the first time you request the previous link the username and the password are both admin.

From the previous you will see in the endpoint address your service (if you missed adding the web context it may be slightly different!!) and if you call it you will see your wsdl:

wsdl

In a real world of course the implementation won’t be so easy! You may use the ejb as you would a normal ejb. You can use the persistent context, call other ejbs etc.

So far everything looks great! If you create a proper client (in any programming language of course) you will be able to call the web service. You can easily create a client using the wsconsume command line tool located in server’s bin. This will create the jax-ws web service artifacts (http://jbossws.jboss.org/mediawiki/index.php/Wsconsume).

Let’s add some more features to the previous examples. We’ll secure the web method by adding two more, the login and the logout. What we want to achieve is to make everyone willing to use the sayHallo web service to login first. We’ll follow the instructions of seam documentation for the implementation of login and logout http://docs.jboss.com/seam/2.0.2.SP1/reference/en-US/html/webservices.html.

Now our class will become:

@WebService(name=”SayHallo”, serviceName=”SayHalloService”)
@SOAPBinding(style=SOAPBinding.Style.RPC)
@WebContext(contextRoot=”service”)
@Stateless
public class HalloService implements HalloServiceRemote {

@WebMethod
public boolean login(@WebParam(name=”userName”)
String userName,
@WebParam(name=”password”)
String password) {
Identity.instance().setUsername(userName);
Identity.instance().setPassword(password);
Identity.instance().login();
return Identity.instance().isLoggedIn();
}

@WebMethod
public boolean logout() {
Identity.instance().logout();
return !Identity.instance().isLoggedIn();
}

@Restrict(“#{identity.loggedIn}”)
@WebMethod
public String sayHallo(@WebParam(name=”name”)
String name) {
return “Hallo “+ name + “!”;
}
}

Of course both login  and logout should be added in the HalloServiceRemote interface. If you make the new client an try to call directly the sayHallo method the method will be called as it did. Which means that the method isn’t restricted yet!

This means that the @Restrict annotation is ignored unfortunately. After a lot of search that I had to do I found out that the only thing that is missing is to name the HalloService to the seam. After adding a @Name annotation the example behaves as expected.

@Name(value=”halloService”)
@WebService(name=”SayHallo”, serviceName=”SayHalloService”)
@SOAPBinding(style=SOAPBinding.Style.RPC)
@WebContext(contextRoot=”service”)
@Stateless
public class HalloService implements HalloServiceRemote {

@WebMethod
public boolean login(@WebParam(name=”userName”)
String userName,
@WebParam(name=”password”)
String password) {
Identity.instance().setUsername(userName);
Identity.instance().setPassword(password);
Identity.instance().login();
return Identity.instance().isLoggedIn();
}

@WebMethod
public boolean logout() {
Identity.instance().logout();
return !Identity.instance().isLoggedIn();
}

@Restrict(“#{identity.loggedIn}”)
@WebMethod
public String sayHallo(@WebParam(name=”name”)
String name) {
return “Hallo “+ name + “!”;
}

}

Now if you try to call the sayHallo web method directly you will get an exception indicating that you will need to login.  (Important notice: The Identity.instance.login() will call the login method that is defined in the components.xml file:

<security:identity security-rules=“#{securityRules}” authenticate-method=“#{authenticator.authenticate}” remember-me=“true”/>

Which by default is the authenticator.authenticate. Make sure that this method is implemented, or at least returns true always for the demo.)

Unfortunately the problems don’t end so easily!!! If you use a plain client most probable thing is that even after login (using the login method) when trying to use the sayHallo you will still get the non authenticated exception. This happens because to use the login properly you need to use a client which can support cookies. That is right. Seam identifies an authenticated client from cookies since it holds the session id in cookies!

If you use a client with cookies everything will work fine!